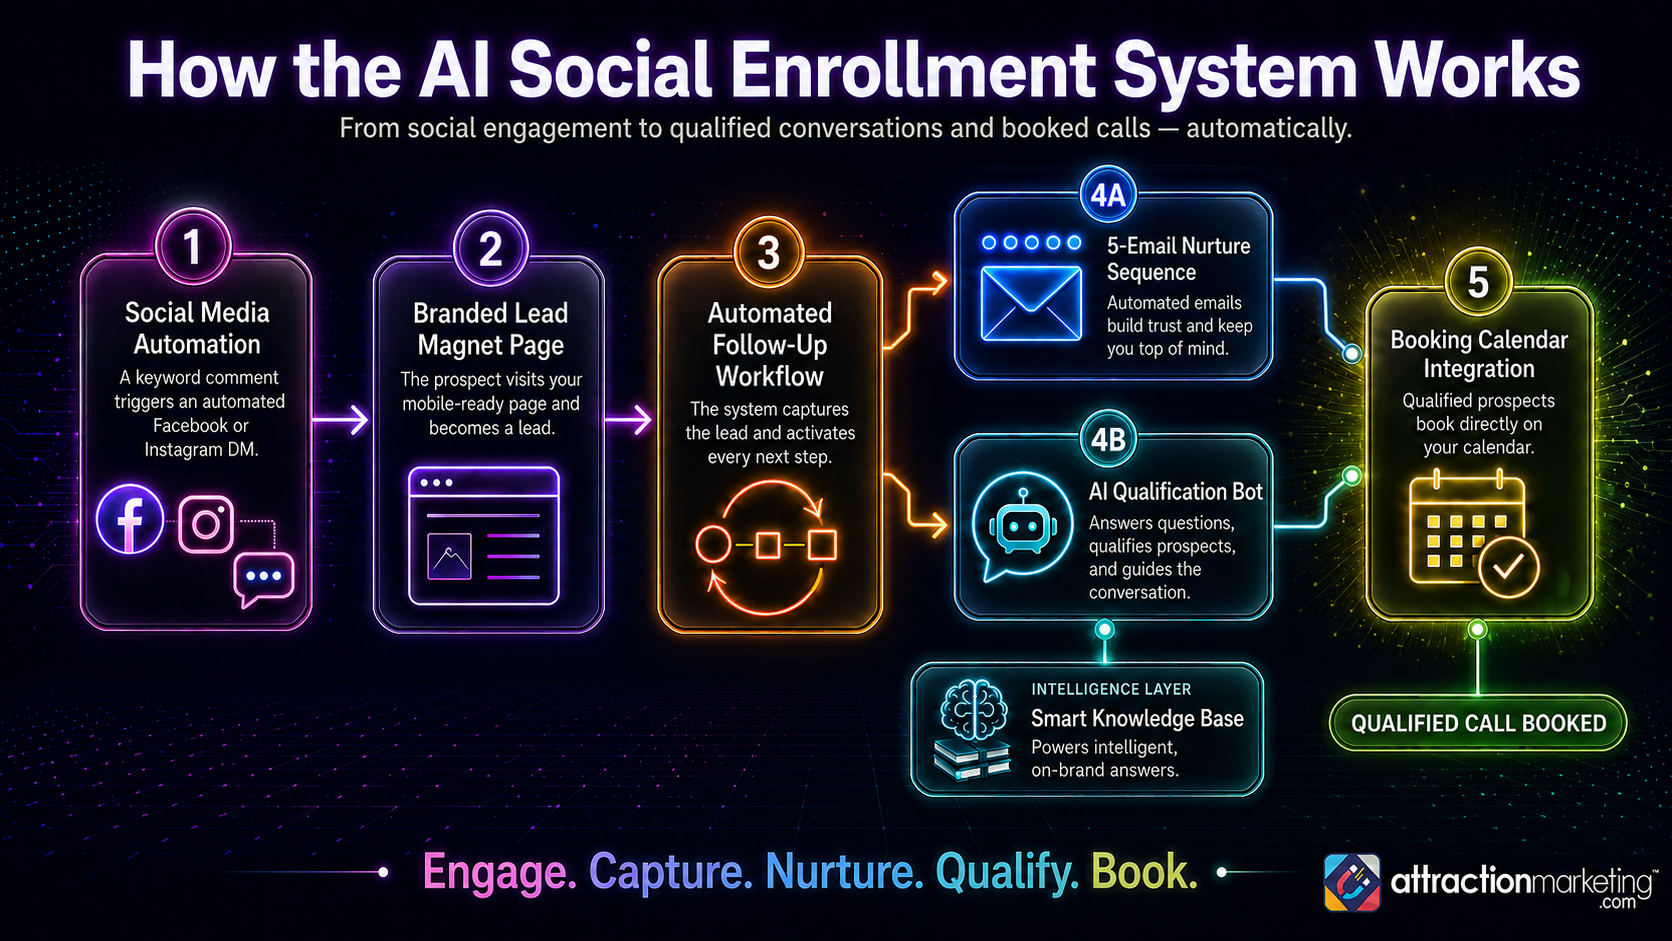
This is the setup order — follow it exactly in sequence.
Each component below builds on the one before it. Work top to bottom, in order, and do not skip ahead. Every piece connects to the next.
Branded Lead Magnet Page
The prospect visits a mobile-ready, branded page and consumes the lead magnet — a challenge, guide, quiz, or resource built specifically for the audience.
Build Checklist
- Review the lead magnet content from the SEADS AI build doc
- Copy and paste the AI build doc into AI Studio
- Set the correct page URL
- Confirm mobile layout and test on both desktop and mobile
- Add SEO title and meta description
- Publish to a live URL using a root domain or subdomain — see the setup guide below for step-by-step instructions on how to set up a subdomain in AI Studio
Smart Knowledge Base
Powers intelligent, on-brand answers. The bot draws from the knowledge base to handle common questions and objections — accurately, consistently, and in the brand voice.
Build Checklist
- Copy the knowledge base from the SEADS AI build doc and paste it into Ask AI
- Confirm all FAQs, objection responses, and compliance rules are included
- Confirm the core message is captured
- Review for compliance — no health, income, or outcome guarantees
Booking Calendar Integration
Qualified prospects book directly on the calendar — no manual scheduling, no chasing. The bot handles the handoff.
Build Checklist
- Confirm the booking calendar is set up in Calendars
- Verify Zoom (or meeting platform) is connected to the calendar
- Confirm the calendar link matches the link in the bot and emails
- Test a booking end-to-end from the bot's routing step
- Confirm confirmation emails are active on the calendar
AI Qualification Bot
The bot answers questions, qualifies prospects through a structured conversation, and routes them based on their readiness — either to a booking or back to the lead magnet with a product suggestion.
Build Checklist
- Build the bot using the Ask AI bot prompt
- Set the "exploring" route: lead magnet link + product link
- Configure the post-email-capture tag and workflow trigger
- Link the bot to its knowledge base (built separately)
- Test the full conversation flow before connecting to social
Email Nurture Sequence
Automated emails build trust, share the story, and keep prospects moving toward a booking — sent on a set schedule without any manual sending.
Build Checklist
- Build all email templates using the Ask AI email prompt
- Confirm all template names match exactly what the workflow calls
- Set sender name and reply-to email
- Verify every CTA link (booking link, product link, etc.)
- Review all emails for compliance — no outcome guarantees
- Save all templates — do not send manually
Automated Follow-Up Workflow
The system captures the lead and activates every next step — tagging the contact, enrolling them in the email sequence, and keeping everything in motion without any manual effort.
Build Checklist
- Create the workflow using the Workflow AI prompt from the builder prompt
- Confirm the enrollment tag name matches the bot's tag action
- Connect email templates to the correct workflow steps
- Set all wait durations between emails
- Save in draft mode — do not activate until full review
- Test end-to-end with a seed contact before going live
Social Media Automation
A keyword comment triggers an automated Facebook or Instagram DM — turning every comment into a private conversation.
Build Checklist
- Connect Facebook page and Instagram account in Social Planner
- Set up the Facebook workflow: Prospect: Social Sidekick: Facebook 4.0 (AI) — found under Automation → Workflow Prospects Social Sidekick
- Set up the Instagram workflow: Prospect: Social Sidekick: Instagram: 4.0 (AI) — found under Automation → Workflow Prospects Social Sidekick
- Confirm the trigger keyword
- Set up the keyword comment DM trigger in Conversation AI
- Test the trigger by commenting the keyword on a test post
Before You Go Live
Master review checklist — confirm every item before activating the system.
- All component builds are complete
- Domain/subdomain is configured and the lead magnet page is live
- Trigger keyword is active on at least one published social post
- Workflow is reviewed and activated
- Bot is connected to social accounts and knowledge base
- End-to-end test completed with a seed contact (full flow)
- Full review and approval completed on all content
- Compliance review complete — no outcome guarantees anywhere
Setup Guides
Step-by-step instructions for the three most common setup tasks.
How to Set Up a Subdomain in AI Studio
Two parts — one in the app dashboard, one in your domain registrar. Do them in order.
In Sites / AI Studio
Go to Sites in the left sidebar and open AI Studio.
Locate your page and open Page Settings (gear icon).
Under the Domain section, click Add Domain or Connect Domain.
Enter your full subdomain.
Example: challenge.yourdomain.com
The system will generate a CNAME record value. Copy it — you will need it in the next part.
In Cloudflare (or your domain registrar)
Log into your Cloudflare account and select your domain.
Go to DNS, then Records, and click Add Record.
Set the type to CNAME.
In the Name field, enter only your subdomain prefix.
If your subdomain is challenge.yourdomain.com, enter "challenge".
In the Target field, paste the CNAME value provided by the system.
Save the record.
Return to the dashboard and click Verify.
Note
DNS changes can take anywhere from a few minutes to a few hours to propagate. If verification fails immediately, wait 15–30 minutes and try again.
How to Create a Booking Calendar
Set up the calendar first — before building the bot or emails, so you have the booking link ready to drop in.
Navigate to Calendars in the left sidebar.
Click Create Calendar in the top right corner.
Select Personal as the calendar type (for one-on-one calls).
Name your calendar.
Example: "Strategy Call with Sam".
Set your availability — days of the week, hours, and time zone.
Set your meeting duration and add buffer time if needed.
Example: 20 minutes.
Under Integrations, connect Zoom so a meeting link is automatically generated for every booking.
Customize your booking page URL to match the link referenced by the bot and emails.
Under Notifications, confirm that booking confirmation and reminder emails are active.
Click Save.
Copy the booking link — paste it into the bot settings and all email templates before going live.
Build Email Templates Using Ask AI
Ask AI will build all email templates directly inside Awesome CRM — no manual copy-pasting into the email editor required. Have the email prompt ready from the build doc before you start.
Navigate to Ask AI in the left sidebar.
Open a new chat or start a fresh session.
Copy the full email template builder prompt from the build doc.
Paste the entire prompt into Ask AI and send it.
Ask AI will read the prompt and begin building all email templates directly inside Awesome CRM. Let it complete fully before doing anything else.
Once Ask AI confirms the templates are built, navigate to Email Marketing in the left sidebar.
Click on Templates and confirm all templates are present and named exactly as specified in the build doc.
Open each template and review:
Subject lines match the build doc exactly · Sender name and reply-to email are correct · All CTA links are present and accurate (booking link, product link, etc.) · No merge fields are broken or missing · Tone and compliance are on point — no outcome guarantees
Do not send any template manually. These are for the automated workflow only.
Cross-reference each template name against the workflow build — every name in the workflow must match a template name exactly, character for character.
Note
If Ask AI builds a template with the wrong name, correct it in the template settings before activating the workflow. A single naming mismatch will cause the workflow to skip that email entirely.
Connecting Facebook and Instagram
Connect both accounts before building the bot trigger — you cannot assign social accounts to the bot until they are connected here.
Important before you start
The Instagram account must be a Professional account (Business or Creator) and must already be linked to the Facebook Page you are connecting. If it is a personal Instagram account, the connection will not work.
Go to Settings in the left sidebar.
Click on Integrations.
Find Facebook and click Connect.
A Facebook login window will appear. Log in using the account that manages the business page — not a personal account.
Grant all requested permissions when prompted. Do not skip or limit any permissions — partial permissions will break the DM automation.
Select the correct Facebook Page from the list and confirm.
Instagram — if the Instagram Professional account is already linked to that Facebook Page, it will appear automatically. Toggle it on.
Click Save and confirm both accounts show as Connected.
Verify in Social Planner that both accounts appear and are active.
In Conversation AI, when setting up the bot trigger, the connected Facebook Page and Instagram account will now be available to select.